Uncategorized


Finally in the zone, the canning comfort zone. Really, for most people isn’t this why they got into canning in the first place? Solanum lycopersicum, the garden tomato. When reading through plant catalogs it is the siren of summer, with her beguiling aliases: Mortgage Lifter, Brandywine, Cherokee Purple, Cuore Di Bue, Green Zebra … She seduces you into ordering dozens of plants with the anticipation of this very moment, the canning of the tomato.

Was there ever any doubt what this month’s can jam theme would be? It had to be her. And as comforting as this ingredient is to me, it was still hard. Hard to do something other than make sauce. Because I horde sauce. I dream of sauce. I have nightmares about running out of sauce. There can never be enough sauce in my larder to make me think that I have enough.

But sauce is pretty boring, and I wanted to do something a little interesting. Not all like crazy weird I’ll never use the product, but something a little more complex. So I allotted some of my precious tomatoes to this task – and if tasting is any indication it was an acceptable gamble.

Canned Pizza Sauce

The Hardware: see The Canning Thing, 3 – 4 pint jars (or any combination of half pints and pints to hold between 3 & 4 pints), food mill, potato masher and a cheap a$$ serrated knife. Now, I don’t usually spend a great deal of time on hardware, I just assume if you are cooking you know what you like to cook with. But I want to take a moment to talk about cutting tomatoes.

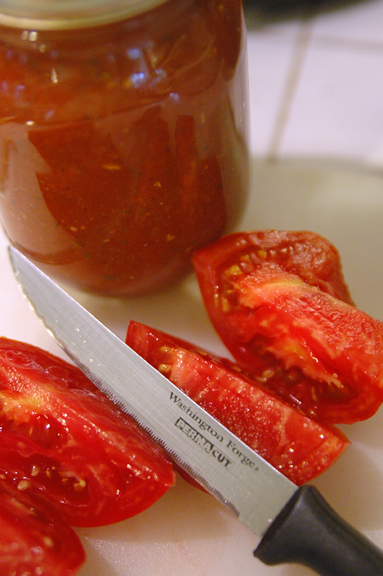
I am a knife snob. Sharp and strong is the way I like them, I don’t have many but the ones I have are choice. All last year during tomato canning I worked with a combination of my Henkel paring and bread knives, using the paring to cut out cores and such then the bread knife for cutting the bad boys into pieces. This year I had a rude awakening. I realized that the cheap block-o-knives steak knives that my hubby brought into our relationship, the ones that were relegated to the gulag of the junk drawer, were the best knives to use for processing my tomatoes. The pointy tip will cut out bad spots and the serrated “never sharpen” edges saw through tomatoes like buttah. I am chagrined.

Cutting up tomatos

Oh the shame.

The Software:
10 lbs Tomatos
4 Cloves Garlic, mashed
2 t Oregano, dried
3/4 t Black Pepper
2 t Italian Seasoning herb mix
3 C Chopped Onions
2 1/2 t Salt
3 T Brown Sugar
1/2 t Garlic/Chili paste
1 T Lemon Juice per pint

Remove cores and bad spots from tomatoes, slice in half or more depending on size, chuck into goodly sized non-reactive pot. Sprinkle with a bit of salt and squoosh with a potato masher. Bring to a simmer and cook until you can mash the biggest piece on the side of the pot with a spoon. Run through food mill and return to pot. Feed all scraps to chickens.

Add everything else except the lemon juice to the pot and simmer until the onions are soft – run through food mill a second time. (You might want to hold off on the chili paste and add that to taste depending on how spicy you like things.) Return everything to the pot (including the stuff that wouldn’t go through the mill – I like chunkies) and simmer until reduced to desired thickness. You know, pizza sauce thickness ie: thicker than a standard sauce but not paste consistency.

Add 1 T of lemon juice per pint and 1 1/2 t for a half pint – fill using your fancy canning gear and stir up a little to mix the lemon in before you lid up. 1/4 inch head-space, Boiling Water Bath for 35 minutes (sea level) adjust for your altitude.

Am I happy?

Yeah, I am happy I made this. Now I can have instant pizza sauce whenever I desire. It was hard, because for that 10 lbs of tomatoes I could have had 4 – 5 pints of sauce. The reducing kills me, I feel like I am simmering away precious tomato goodness. But I know that is silly.

Unfortunately my tomato plants are not producing as I would like this year. I managed to pull this off with home-grown, but if I am to have a larder that will allow me to sleep at night I might have to resort to the farmer’s markets. Tell me truthfully, for you, how much is enough? Do I have a problem?

ps: If I had known then what I know now, I might have held off on my Salsa Verde post and put it here instead. I am afraid that the tomatillo isn’t going to get the face time it should in this months round-up. The green stuff vs the red stuff is a Sophie’s Choice kind of conundrum for me. So take a moment and give some love to the little green guy.
The big experiment in my garden last year was tomatillos. Initially I went around looking for tomatillo plants to put in my garden, but every time I asked about them at a garden center I was regarded as if I had two heads. What is this alien to-mah-taho that you are looking for. Eventually I found a package of seeds and decided to take a whirl at starting at square one.

It was quite a steep learning curve. For the non-gardeners out there I will pass over the gory details – but in the end everything came out all right. Better than all right in fact, because I ended up canning many, many jars of Salsa Verde. It was a fairly painful process finding the best recipe to yield the results I desired – but there were no, true, failures. And as per usual, I ended up modifying to get my own.

A baby Tomatillo in my Garden

One of the most disappointing recipes was the one from the University of New Mexico – I thought that if anyone would get it right it would be them, but it was a no go. The flavor was fine, but the end texture wasn’t particularly salsa like. Imagine taking a super chunky salsa, dumping it into a strainer over your sink and allowing it to drain for about 15 minutes – that is the textural quality of the UNM recipe. While it didn’t fly as a salsa – I did use it to great success as a green chili starter. Chuck a jar of it plus a jar of water or stock into a saucepan (or crockpot) along with a can of beans and meat of your choice and you have some delicious chili.

The UNM recipe was the second one I tried – and it turns out the first one was much more successful. From Married with Dinner this Salsa Verde was much closer to what I was looking for – although I can handle much less heat. So for my third try I went back to this recipe and tinkered with it until I produced something I wanted to eat directly from the jar with a spoon. With apologies to the lovely MWD couple – I like mine better.

All of this left me with jars and jars of Salsa Verde for the “off season” months – their consumption a chore to which I applied my most willing efforts. Hence the subject of this “Using It”.

Taco with Tomatillo Salsa

So very much better than Moe's.

Taco Verde

The husband was out of town, but I still felt like busting out the tortilla press and comal to make my own tortillas – because they are simply that much better than store bought. Starting with leftover, shredded chicken in a small saucepan I stirred in enough Salsa Verde to make it saucy and reheated. While that was coming to temp I made the tortillas and from there it was a simple matter of assembly. Tortilla + chicken verde + cojita cheese + Flashy Trout Back baby Romain from my mother’s garden. Wonderfully delicious with a balanced tangy, salty flavor on a corn tortilla that actually tastes like corn. I know my mother probably thought that the tortilla press I asked for for Christmas was going to go into the pile ‘o gadgets-that-looked-like-fun-but-are-actually-a-pain-in-the-butt-and-will-be-in-my-next-yard-sale, but it didn’t. I have been using and loving it since January.

Salsa Verde (You totally thought I was being a tease, didn’t you?)

The Hardware: see The Canning Thing, a food mill, food processor (or a knife you know), 3 to 4 pint jars, paper bag.

The Software:
3 – 3 1/2 lbs of Tomatillos
1 1/2 C Onions, chopped
1 Aneheim Chilie
1 Poblano Chilie
1 T Chopped Jalepeno
6 cloves Garlic, Minced
2 T Cilantro, finely chopped
1T + 1t Cumin
1t Salt
1/8 C Lime Juice
3/8 C Apple Cider Vinegar

Preheat your broiler to High. Peel the husks off of your tomatillos and wash off all of the icky sticky stuff – I use a vegetable brush. Also wash your peppers. Remove their stems and cut the tomatillos in half across the equator, place cut side down on a foil lined cookie sheet. Cut the peppers in half longitudinally and remove stems and seeds, place cut side down on the cookie sheet also – you will most likely need 2 cookie sheets, or do two batches. Whichever floats your boat.

Place under the broiler for about 7 minutes, until they start turning a little bit black/brown on the top. Remove from the roaster and place the chilies into a paper bag or bowl covered with plastic wrap. Drain the liquid from the cookie sheet into a saucepan and dump the tomatillos into a food processor and then chopity chop – don’t puree, but get down to smallish pieces. Dump tomatillios into saucepan. Remove the chilies from the steaming device and remove skin. Chop these puppies up also and put them in the saucepan.

Put everything else except the cilantro into the saucepan and bring to a boil. Simmer for 10 minutes and then pass through a food mill with the big hole setting – do not discard the stuff that won’t go through the mill. Return everything (even the chunkies) to the pot and bring to a simmer, add cilantro and adjust seasonings to taste. The do the canning thing. Leave 1/2 inch headspace and boiling water bath for 15 minutes adjusted for your altitude (here in Atlanta I add another 5 min).

Conclusion:

When I adjusted the seasonings I added some garlic powder and additional lime juice – you can always add more acid to taste, but don’t reduce. Having this in my larder has been a menu changing event. We eat it as frequently as we can, but always keeping an eye on the remaining quantity because we don’t want to run out.

Other uses have included smearing it on the first tortilla into the pan when we make quesadillas, enchiladas and various salsa like applications such as tacos, taco salads and consumption with chips. If you have any other ideas what I can put this on, please let me know!

It turns out that my bulk mashing post is one the more popular posts on this here blog. It kind of makes me feel better about myself knowing that there are others out there that cannot resist the bargain bag of ‘taters even when we know darn well that we cannot eat the whole thing before it goes over to the dark side.

But this time it wasn’t my fault – it was totally my Mom’s fault. You see, just after the holidays they pull up stakes and relocate to warmer climes which leaves me as the beneficiary of the “cleaning out of the perishables”. Not that I am complaining, free food – especially a staple – is always welcome in my home. And yet I found myself, once again, staring at the lumpy proliferation of tasty tubers in my pantry.

Which sat in my pantry.

And sat.

Until I said CRAP I gotta do something with those ‘taters. So I did, about a month ago (what you thought I had magic ‘taters that lasted from the end of December until February? – no chance, not with our humidity), but I waited to let y’all know until I had fully tested my plan. Because I don’t want to pass on any crappy advice, I have standards you know?

Like mashed potatoes - only you are supposed to eat a whole bowl.

The Initial Spud Soup Starter

The Hardware: A big honkin’ pot, immersion blender, ladle and quart freezer bags

The Software: A metric butt-tonne of russet potatoes and enough stock to cover, plus whatever spices you like.

Take your ‘taters, peel then chop them into chunks – toss them into your big honkin’ pot. Pour in enough chicken stock to just cover the spuds. If you are a vegetarian type person, I am sure that a vegetable stock would work. Cook the ‘taters until they can be easily poked through with a skewer and turn off heat. Now here is where we get crazy.

Don’t drain them.

Take your handy-dandy immersion blender and puree the tar out of those ‘taters. What you will end up with is something much to runny to be mashed potatoes but much too thick to be actual soup. I call this “soup starter”. You can season at this point – until you like the taste, but be careful with the black pepper. Black pepper intensifies even in the freezer. You can always add more seasoning later – but it is tough to fish it out. I added salt, a little bit of pepper and some garlic powder. Hmmm, I wonder what would have happened if I had cooked some garlic cloves with the ‘taters? Next time maybe.

The important thing here – do not add any dairy. No milk, no butter, no cream cheese, no sour cream, no cheese. These things do not freeze terribly well in a team environment. They like to go their own way, to seperate themselves. Bust out your ladle and fill up as many quart freezer bags as you can manage. Try to get as much air out of them as possible and lay them flat on a tray. Make sure you label & date them and then chuck them into the freezer. Freezing flat makes it easier to store the bags after freezing and makes the food thinner and more widely distributed; therefore easier to thaw.

The Spud Soup

This is why it took a month for me to post this – I wanted to make sure it worked. I had significant concerns about the texture of the soup after the freezing. Luckily I was able to thaw and revive our patient with little quality loss. Score one for Cryogenics!

Pull out a freezer bag of your soup starter and microwave it on very low until you can mush it around enough to decant into a large saucepan. Once the soup is in the saucepan – heat on low, stirring and mushing frequently until everything is thawed (or almost thawed, if you are like me an have no patience it will still work). Thin the soup to slightly thicker than desired consistency with stock (of whichever persuasion floats your boat).

If you are a vegan and used vegetarian stock – well, I cannot help you much beyond this point – it is going to get ugly for you so you might want to stop. The next things you want to add to bring your soup to it’s final luscious consistency are those prima-donnas who eschewed the freezer, milk and butter – the dairy divas. Add as much as you want – I won’t tell.

Season to taste, I like salt and a good bit of pepper, plus some more garlic and a wee bit of nutmeg. You follow your bliss. In the above picture you might notice some lumps – I actually dumped in some frozen corn because really, can you ever have too much starch?

Toppings can be applied with wild abandon. Personally, I cannot conceive of potato soup without bacon and cheese. While we were eating I mentioned to the hubby that some caramelized onions would have been delicious piled on top. If I had had a can of French’s onions handy – I can guarantee you they would have made an appearance.

What do you think would go well on top?

And I guess here is as good of a place as any, here being an explanation of why I would name a food blog Robbing Peter. The old cliche, “Robbing Peter to pay Paul” seemed to be a pretty good analogy for the cooking style I have been developing to cope with current economic times.

You see, I have developed this theory that the food that I cook for my family has three primary considerations when it comes down to it: Quality, Cost and Convenience. And unfortunately you can only have two out of the three in any given situation.

Huh, you might say?

And I would say, for example, if a food is of high quality and is a convenience food (i.e.: prepared meal etc…) then it is not going to be cheap. Or, if you find a convenience food that is cheap then odds are that it is not going to be of the highest quality. This means I often find myself in the position of Robbing Peter, sacrificing one element to acquire another element that I desire.

In the past, when money seemed to be falling off of trees, I had no problem laying cost on the sacrificial altar to make sure things were quick. Now? Not so much. Now cost has risen to the forefront of concerns in my life as I suspect is happening in many others’ lives. But, I try my best to avoid throwing quality under the bus.

Which leaves us with convenience, or time, not the most available commodity in my world dominated by a 2 year old. The solution I have developed is stealing time when I can find it and using that time to make my own convenience items. As I come up with ideas, successful or otherwise, I intend to share them here – so watch this space!