Having a fussy eater can be challenging at times. Which is not to say that my little guy is one of those “will only eat chicken nuggets” types. I have seen him cheerfully tuck into a bowl of smoked salmon chirashi because he knew that he liked all of the components (smoked salmon, julienne carrots, sesame seeds, rice, soy sauce), but for some reason we have been having difficulties with lunch. He just doesn’t want to eat it unless it involves getting in the car and driving through someplace. I think it might be less about the eating and more about the going (I cannot play with him non-stop and he takes it personally).

But obviously we cannot go out every, single day so I really needed to come up with a solution. After multiple rejections of food items I decided to take a radical approach and ask him what he would eat every day for lunch. He pondered this and said “Squishy bean quesadilla.”

This kid is a bean maniac. He has not met a bean that he did not like. It started off with black beans but we then went to a Mexican place that did not have black beans but instead served him the more traditional refried pinto beans. These have been officially dubbed “squishy beans” and are now in the rotation as well as being his preferred filling for quesadillas.

The internet seems to think that it is perfectly fine to freeze quesadillas so I figured I would do a bit of batch cooking to save some time and money. The money part comes in not throwing away a partial can of refried beans. Historically we have cracked open a can and kept it in the ‘fridge to use as we went; but it has consistently gone bad before we manage to use the whole can. It gets shoved around and hides behind the mango juice and then we have this crusty mess that goes directly into the gar-bahge. By making as many quesadillas as the can can handle (heh, can can) we will be avoiding that waste.

Large batch quesadilla making for the freezer

Cooling their heels

Refried Bean Quesadillas

The Hardware: sauce pan, griddle or large frying pan, offset spatula or butter knife, cooling rack

The Software:
1 can Refried Beans
8 Whole Wheat tortillas (soft taco size)
1 8 oz bag Quesadilla Cheese
Cumin and garlic powders
Oil or butter for browning

Set up both a staging area and a cooling area to make assembly line production easy.

Crack open the can of beans and scrape them into your sauce pan, they will fight you but you must be strong. Marvel at their ability to maintain a can shape and then stir them up on medium low heat. Add cumin and garlic powder to taste and stir until they are heated up and easy to spread. Remove from heat and place at the beginning of your assembly line along with your cheese and tortillas.

Now, I love my electric griddle and when it dies it will receive  a proper sending off just before we get a new one. It is perfect for making pancakes, french toast, grilled peanut butter & cheese sandwiches (separately, not peanut butter & cheese in the same sandwich shudder), hamburgers … you get the picture. And I cannot imagine tackling batch cooking like this using only a single skillet. But if that is what you have then go for it.

Heat up your cooking implement of choice and grease it up with a bit of oil. I used a folded paper towel with oil to re-oil between quesadillas. Take each tortilla and spread 1/8th of the beans on 1/2 of the tortilla. We are making folded quesadillas and this will make things easier. Place as many 1/2 beaned tortillas on your cooking surface as possible and then sprinkle your cheese on the non-beaned half of the tortilla. Allow to cook until the cheese starts to melt a bit and then fold in half.

Arrange the folded quesadillas so that they are taking up less space and add another 1/2 beaned tortilla to the griddle. Put cheese on it and check the folded ones. As they become brown on one side, flip them to the other. When both sides are well browned, remove them to a cooling rack. Continue folding, rearranging and removing quesadillas until you have added cheese and cooked all of them.

Once fully cooled, place in freezer and freeze until solid. Transfer to a big ziplock bag or something like that. I bet you could wrap them individually in foil too. I haven’t reheated any yet but there are various reheating options. I plan on reheating from frozen in the oven, probably for about 20 minutes at 350F.

The Results:

I will report back after I have served one from frozen. I am pretty confident that it will be quite tasty. If you want you could totally add some other ingredients. I bet sauteed onions would be awesome, or perhaps chicken or another meat. I would add them at the same time I added the cheese.

What do you like in your quesadillas?


Considering that the sponsor herself at thursday night smackdown was unable to keep her deadline (for good reasons) I am hoping that my tardiness will not eliminate me from participation. And since I am relying on her good nature (HAHAHA) I am going to confess that not only did I not make this on Tuesday for Hobo Tuesday; I did not even make it for dinner! It was my lunch, today, Thursday.

Whew, I feel better now that I’ve gotten that off of my chest.

Actually, I don’t know if I would let myself participate, because I didn’t even follow the theme. I don’t do spicy, but I do do things that could be spicy if you wanted them to be. Take this:

Heuvos Rancheros en Cocotte

You got your Mexican in my French! No you got your French in my Mexican!

In a fit of literalness I have decided to call this exactly what it is:

Huevos Rancheros en cocotte from my own demented little mind

Hardware: a cute oven safe ramekin and an oven.

Software:
1/3 C doctored up canned black beans
2 eggs
2 T milk
2 big pinches of shredded cheddar cheese
1/8 C salsa (I use Pace, so sue me)

My beans were left over from burritos a few days ago, I start with a can of black beans and add a bunch of garlic, cumin, oregano and Liazano Salsa until they taste good; hence doctored up. Take your cutsey little ramekin and lube it up with butter (hey, this dish is 1/2 French – gotta work butter in somewhere) and pre-heat the oven to 375 or so.

Put the beans into the ramekin and make two beds for your eggs by pushing things around with a spoon and then carefully crack the eggs into their little troughs. Sprinkle some salt and pepper on them and then drizzle the 2 T of milk over top. Put in oven for about 8 minutes (or until things start to bubble and the whites look opaque) and then pull out and sprinkle the cheese around the bubbling edges and slide it back into the oven for a few more minutes. Take the eggs out when they still look underdone and let it rest for a couple of minutes. Spoon salsa over top and you are done.

Talk about a protein bomb! I guess you could work in some veggies with the beans if you are so inclined – but I thought it was great as is. Now, there are several locations where one could make this spicy. Jalapenos in the beans would be an obvious choice, but more sneaky would be sprinkling some cayenne over the eggs so that it looks like paprika. The hotter the salsa, the hotter the entire dish. I am a wuss, so mild all the way baby!

The Damage:
1/3 can black beans = .30
2 eggs = .42
Milk = .05
Cheese = .15

Everything else is pantry. I feel comfortable including Salsa as a pantry item considering it outstripped Ketchup as the most purchased condiment in the US.

The total comes to .92. I only cooked for one, but my hubby would have loved this had he been here – doubling the cost comes to $1.84 to serve 2 people, actually, to fill my husband we probably would have had to use more beans so lets call it an even $2.00.

Well, new to me anyway. In my quest to actually consume leftovers instead of allowing them to languish in my ‘fridge in a misguided attempt to foster the evolution of new lifeforms I have stumbled on a new casserole technique. Now I am confident that many people reading this (assuming that many people will ever read this, which is a pretty big assumption to make) will receive my revelation with a Pshaw! Pshaw I say.

But having grown up on the Ohio River the concept of a Tamale Pie was about as unfamiliar and exotic as the pink sports-coats and palm trees on Miami Vice. And somehow, I remained blissfully ignorant of the Tamale Pie as my culinary experience grew. Possibly it has to do with the fact that some dishes are not considered classy enough to warrant an entry in a “real” cookbook. But here is where my JLC come in.

In my copy of  Talk About Good published by the Junior League of Lafayette, LA there are several versions of Tamale Pie which I have perused with much interest. When I asked my husband what his opinion of Corn Meal mush was, he made quite the face. I am pretty sure if I had told him we were having polenta for supper he would have thought me quite the gourmand.

Having made a couple of Tamale Pies I now feel fairly comfortable in their construction and can safely say that I feel they are an excellent addition to my arsenal against leftovers. So this isn’t exactly going to be a recipe as much as a technique for you to use. I am afraid you will have to find other resources for your science experiments, because your leftovers will not be hanging about much anymore.

Can you love Leftovers?

Can you love Leftovers?

Cornmeal Leftover Casserole

Basic Cornmeal Mush ratio: this makes enough to top a basic 8 x 8 casserole. Increase the amount based on your casserole size. I would say your standard 9 x 11 would start with 3 C dry cornmeal and increase everything else appropriately.

1 C Cornmeal
2 1/2 C Water or Stock
2 T Vegetable Shortening (other fats might work – I just haven’t tried them)
Seasonings to taste*

Put 1 1/2 C of water, shortening and seasonings in a saucepan and bring to a boil. Mix the remaining 1 C of water with the 1 C of cornmeal. When the water has reached boiling, add the cornmeal and stir. Reduce the heat and stir, cooking for about 10 minutes. You will have to stir pretty much the whole time, if it gets lumpy discipline it with a wisk.

*Because all of my leftovers for this afternoon were Tex-Mex I used the following seasoning:
1 1/2 t Salt
1/2 t Sugar
1/4 t each Chili Powder and Black Pepper

Before I started the cornmeal mush I assembled the leftovers in a small, greased casserole. Dinner last night consisted of burritos made with black beans and ground turkey taco meat. I mixed a can of diced tomatoes in with the beans and added garlic, Lizano sauce, salt & cumin then dumped it in as the bottom layer. The next layer was some chopped onion and I topped it with the ground turkey taco meat. For some added yumminess I scattered a layer of cheddar cheese on the meat.

And then you pour on the cornmeal mush and spread it all over the top to seal in the goodness. Bake in a pre-heated 350 oven for about 30 minutes and then hit the top with your broiler until it is nice and crispy. Voila! A brand new dish that kinda tastes like last night, but not really. And man will it stretch your servings of meat.

Potential Hacks:

Kinda pointless, I know, seeing that this entire “recipe” is pretty much a hack. But I was thinking about the whole “polenta” thing and it occured to me I could use this to make a casserole from leftover Italian flavored components. Put some Italian Herbs in the cornmeal instead of the chili powder and you could use it to top off … say … a leftover batch of meat sauce layered with mushrooms and mozzerella cheese. Or maybe leftover Italian sausage and peppers … it could get interesting.

note: A true Tamale Pie has cornmeal as both the bottom and top layer, to do this you will simply have to increase the amount of mush make proportionately. The positive part of this is the fact that cornmeal is CHEAP. It is an excellent method of making it possible to have large servings that fill you up – while not breaking the bank.

Within the recent past (last few years or so) I have overcome one of my deep seated childhood food revulsions, beans. For the longest time I could not get past the texture. Something about the smushiness combined with the resistance of the skin gave me the willies.

But no longer.

And when I discovered that I no longer despised beans, I kind of went on a bean bender. I wanted beans with every meal, I tried every kind of bean I could get my hands on. My new obsession with beans lasted almost 9 months, and then I was burnt out. If beans were in something I would not reject it out of hand as I had before, but I no longer sought beans out with the determination of a bloodhound.

Now, I have found a happy medium. Beans are a part of our weekly diet, but they are not in every meal. At times they are bit players and at times they are the star attraction. This dish is so deeply satisfying that it does not allow you to lament the fact that you are eating a meatless meal. And it makes rocking leftovers.

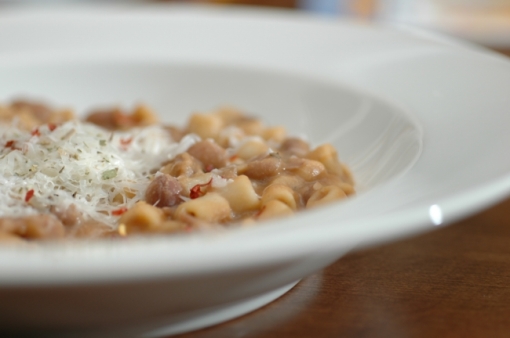
Beans and Pasta, how can one go wrong?

Beans and Pasta, how can one go wrong?

Pasta e Fagioli

Adapted from Nigella Cooks

The Hardware:

Large Saucepan or small stockpot, Saute Pan, Blender, Tea ball (optional)

The Software:

1 lb Dried Cranberry Beans
1 T + 1 t Chopped Garlic
2 – 3 Sprigs Rosemary
1 Bay leaf
1 Onion, chopped
1 T Tomato Paste
2 C Chicken or Vegetable stock or Water
7 oz Ditalini
Parmesan Cheese
Olive Oil
Salt & Pepper to taste

1) Wash and pick through beans, soak overnight or for at least 6 hours.

2) Pour some olive oil into a large saucepan (or small stockpot) and sauté onions until just browned, add 1 T garlic and sauté briefly. Add beans and cover with water 2 inches over beans.

3) Place 2 sprigs of Rosemary and Bay leaf into the teaball and hang into pot. If you don’t feel like being all fancy with the teaball then you can use a sachet – which to me seems even fancier. Nigella tells you to put it into a knee-high stocking but I think that is kinda creepy/nasty. Bring to a boil and then simmer for 1 hour. Check periodically and after beans are tender add salt to taste. Start with less then you think you will need, you can adjust at the end.

4) When the beans are nearing the end of cooking, clean and mince additional rosemary, at least 1 teaspoon – more if you like. Remove 1 C of beans from the pot and put them in your blender. Puree them well, you might need to add a little of the cooking water. While doing this, bring the beans back to a boil with the addition of 1 C of stock or water and add pasta.

5) While pasta is cooking, bring a tablespoon or two of olive oil to medium heat in a sauté pan add 1 t garlic and sauté slowly until it begins to roast a bit then add the tomato paste, minced rosemary, some salt and some pepper. Sauté briefly and then add the pureed beans and stir together well. Turn heat to low and allow to blend, if it takes too long for the pasta to cook go ahead and turn the heat off of the sauté pan and let it hang out.

6) When the ditilini is al dente, add the pureed bean mixture back to the big pot and stir well. If it seems too thick add more stock or water. Continue cooking at a simmer until the pasta is completely tender. Adjust seasonings as you like.

7) Serve in a bowl with grated parmesan and if you like a little heat, a sprinkling of red pepper flakes.

Potential Hacks:

I have made this with a mirepoix mixture in the beginning and it turns out just as nicely with the added bonus of more veggies in the dish. You could also increase the amount of tomato paste if you wanted to up the tomatoey quotient.

There are as many recipes for this dish are there are Italian mamas, and I do not claim to be an Italian mama. One of the significant variations between versions is it’s end thickness. In some interpretations you get a tomatoey broth with beans and pasta floating about among a variety of veggies. In other interpretations you could slice yourself off a chunk like cold macaroni and cheese.

Your best bet is to tinker with this until it makes you happy. The only thing you need to be careful about is when you add the salt. If you add salt at the beginning of the cooking process your beans will take forever to soften, if they soften at all. Don’t know why, if you find out let me know O.K.?

Close Up

Let’s get things started right. I have been working on this dish for awhile, fine tuning it to my family’s taste and I think it is ready for prime time!  It is a true pantry/freezer meal, the only things in it that have to come out of the ‘fridge are the shredded cheese and the Lizano. Everything else can be stored in the pantry. It is composed of inexpensive food items so you can buy quality ingredients without breaking the bank – the only thing you need is time. And the time is mostly hands off time, so no biggie there.

Hardware:
First off, the hardware. I make this in my 2.8 Liter Oval Souffle dish with a glass lid. It really needs to be cooked in something fairly deep as opposed to one of those large rectangular casserole dishes. A medium Dutch Oven could work, as you can see in the picture the dish ends up being pretty thick so beware anything too shallow.

The Software:

1 can Black Beans, 15 oz
1 C Brown Rice, rinsed
1 C Frozen Corn
1 can Diced Tomatoes, 14.5 oz
1 can Rotel, Mild, 10 oz
1 t Granulated Garlic
1 t Ground Cumin
1/2 t Dried Oregano
2 T Dried Chopped Onions
2 t Salt
Black Pepper to taste
1 1/2 T Lizano Sauce
1 1/2 C Water or Stock
1 t Olive Oil
Shredded Cheese, Cheddar or Queso (amount depends on the size of your container)

Pre-heat oven to 375 F. Get a piece of heavy-duty foil ready that will cover the pot.

1) Combine tomatoes, Rotel, garlic, cumin, oregano, onions, salt, pepper, Lizano, and Water/Stock in a sauce pan over medium heat – the goal is to bring it to a boil. Take your cooking vessel and spray it with non-stick, measure your corn into the dish with the rinsed rice. Rinse beans gently and add to dish and drizzle with the olive oil, stir gently to combine.

2) Once the tomato mixture has come to a boil, pour into the dish and stir to combine. Cover tightly with the foil and top with lid.

3) Place in oven for 1 hour 15 minutes. Remove foil and stir gently to get the tomatoes distributed but pat the top back out smooth, taste to make sure the rice is done.
If the rice is undercooked replace foil and lid and cook until rice is done unless the rice is really “soupy” then do not cover.

4) When rice is done, sprinkle (ok cover) the surface of the rice with cheese of choice and return to oven uncovered. Remove from oven when cheese is nice and melty and bubbling, can take 5 minutes.

Ingredients/Potential Hacks:

Obviously the mystery ingredient here is the Lizano. If you poke around some of your Hispanic groceries you can find it, it is specifically Costa Rican and if you have a market that caters more to Central Americans than Mexicans you will have better luck.

I haven’t come up with a good substitution, it isn’t a tomatoey sauce but a savory sauce. Kind of like a Costa Rican version of HP sauce. It has Cumin and pureed veggies and odd stuff in it, but it is super tasty. It is worth it to have it in your ‘fridge and see what you can put it on.

Regarding the beans; I have measured a can of beans and it contains roughly 1 3/4 C of cooked beans. So if you wanted to use re-hydrated dried beans that is what you would be aiming for, but I don’t think that simply soaking and then tossing in would work. They would need to be cooked beans.

You can definitely up the heat on this if you wanted to by buying one of the hotter versions of Rotel I am a big ole sissy so I use mild. You could even add some jalapenos if you wanted to be wacky. Another fun variation can be had if you have a Trader Joe’s handy. They sell a frozen “fire roasted” corn that gives a lovely smoky flavor to this dish when you use it in place of plain ole corn.

If you really  wanted to, you could use white rice – but we like it much better with brown. You wouldn’t have to boil the liquid ahead of time and you would use less water/chicken stock – 1 cup should do it. Also your cooking time would most likely be shorter, maybe 45 min to 1 hr. If you try this out please let me know what your cooking time was.

Enjoy!

At the end, this seems like an awful lot of writing for what is really a simple dish. The process is really one step away from “dump it in the casserole and bake” but I wanted to add in all of the little details that have made this a sucessful meal for my family. We eat on the leftovers for days, it reheats in the microwave beautifully and makes a tasty lunch.