I make no claims to authenticity for this dish. It was thrown together from things out of my pantry, and I must say it was very tasty. I had dinner early and when the hubby came home late to eat his I was sorely tempted to have a second bowl. Pantry meals are essential to anyone’s repertoire, and sometimes you rely on some pre-packaged items to cut down on time.

Of course you could use a can of diced tomatoes – or even chop up a tomato or two. Then you could add a can of diced chilies – or roast and dice your own fresh chilies. I am sure it would add significantly to the flavor. But I, being a good southern girl, always have a couple of cans of Rotel in the pantry and it gives me the tomatoes, chilies and some additional spices in one convenient package. Turn your nose up if you will – but it makes life easier for me.

I totally forgot to put the cheese on - you can imagine it yourself.

Easy Mexican Chicken Soup

The Hardware: large saucepan, spoon, can opener.

The Software:
1 Onion
2 t Chopped Garlic
1 can Rotel (I used mild because I am a wussy – use whatever you can handle)
2 T Lizano Sauce
2 C Shredded Chicken (had it in the ‘fridge, you could use rotisserie if that’s your thang)
2 pinches Oregano (dried)
2 pinches Cumin
1 T Lime Juice
1 Qt Chicken Stock (I used home-made, you do whatever you want)
1 C Frozen Corn
3 T Masa
pinches of Salt, Pepper and Granulated garlic to taste
2 C cooked rice or a couple of handfuls of  tortilla strips

Slice onions into half rounds and saute in a large saucepan in a couple of tablespoons of oil until the onions are soft. When they start getting brownish add the garlic and saute for about a minute – don’ t let the garlic burn. Add the Rotel, Lizano & chicken and stir around a bit, bring to a simmer. Add stock, lime juice, oregano & cumin and bring back up to almost a simmer. Then sprinkle in the Masa and curse when it forms dumpling-like globules.

Seek and destroy Masa globules by squashing them against the wall of the saucepan with the back of your spoon. Or you could be smart and measure out the Masa into a small bowl and add some of the not-yet-hot stock to it to form one of them there fancy pants “slurries”  before you add it to the pot.

Bring everything up to a simmer and then add the corn. Bring to a boil, stirring to make sure nothing sticks and scorches. Adjust seasoning with salt, pepper & granulated garlic until you are happy. If you are using rice, divide it between your bowls and then serve the soup over top. If you are using tortilla strips put the soup in first and then top with crunchies.

It doesn’t hurt to sprinkle some cheese on top. But really – can’t you say that about just about anything?

Potential Hacks:

This could easily go vegetarian. Replace the chicken stock with veg stock and replace the chicken with a can or two of beans, poofy violia – vegetarian. Actually, the beans would be good as an add on if you wanted to bulk it up more. Skip the cheese and dairy and I believe this would be vegan – but I have limited understanding of vegantology.

If you do not have Masa hanging around (and I am guessing that is a goodly number of people) then you can just crumble up some tortilla chips and let them simmer in the soup. They will disintegrate and serve the same thickening purpose. You know what tortilla chips are made out of? Masa.

This came out a bit spicier than I really cared for, cause I am a wuss, so I wanted to add some sour cream to dial back the heat. But I didn’t have any sour cream. Whipped cream cheese, however, was in my ‘fridge. So I made some little canels out of the cream cheese and, after being stirred in well, it worked fine. Sour cream would have been better.

And of course, there is the Lizano. You really should just keep it in your ‘fridge. It is a wonderful thing. It is delicious in eggs. It can turn regular rice into instant Mexican rice. Stir it into a drained can of beans and you suddenly have super tasty beans. Dribble it onto your tacos or burritos. It is a fantastic ingredient that really has no substitute. If I have not convinced you to seek it out – then you are just going to have to crank up all of the seasonings. Add more cumin, oregano and garlic. Add a little chili powder, but be careful you do not turn the soup into chili.

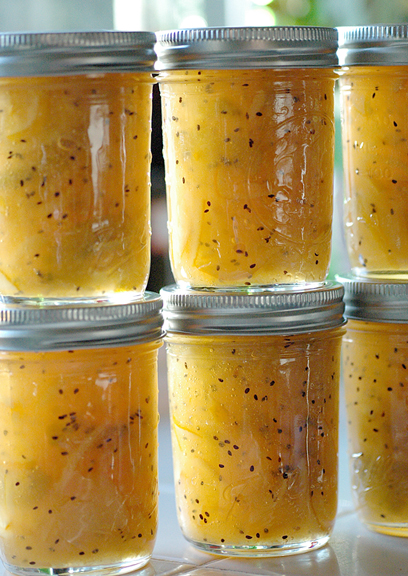
In the dead of winter there is something beckoning about the sunshine-y orbs of citrus at the market. Resistance is futile. Even though I have satisfied my can jam obligation, I have not satisfied my lust. One object of my attention was the Citron. In the aisles I hefted it into my hand, caressed it, sniffed it, threw longing looks in it’s direction after I had replaced it in its’ pile. Even I could not justify purchasing it, having NO CLUE what to do with the thing.

So I transferred my affection to the Meyer Lemon, bastard offspring of the Lemon and Mandarin Orange. I knew it would be kind to me as opposed to the fickle mistress the Citron. And I had a recipe! Many years ago, when I first tried my hand a canning, it was because I went out and picked several pounds of blackberries. Then I realized I had no idea what to do with them – backwards I know. At the time the canning section at my local book store was slim pickings so I ended up with one slim volume: The Joy of Cooking All About Canning & Preserving. It is not a book that I have seen much mention of on the Food-Blogosphere but I find myself liking it more and more.

Doubly so because it brought this into my life:

You had me with the freckles you saucy girl you.

You had me with the freckles you saucy girl you.

Meyer Lemon Kiwi Marmalade: from All About Canning & Preserving – Joy of Cooking Series

The Hardware: Canning stuff – I think I might need to make a seperate post just for this. OK, I did it see The Canning Thing. This makes 7 – 8 half pint jars.

The Software:
1 1/4 lbs Meyer Lemons
4 C Water
1 1/2 lbs Kiwi (firm/ripe)
5 C Sugar

Wash your lemons well and then slice them all in half along the equator. Using scissors, snip out the center star of white membrane and discard along with seeds.

The next step is to slice the lemons thinly and place in a big bowl with 4 cups of water. The thin skin of the lemons proved to be too challenging for my cheap a$$ “mandolin” and slicing them by hand was no pic-a-nic either. And I have sliced more things than the a-ve-rage bear. Let the whole mess sit overnight in the ‘fridge.

Whenever you get around to it the next day toss the whole shebang into a big pot and simmer for 15 minutes. While doing so, peel and slice the kiwi into 1/4 rounds.

Put a second pot on the range and measure 2 1/2 C sugar into it – add half the kiwi. When the lemons have had their jacuzzi, move half of them over to the other pot and add the remaining sugar and kiwi to the original pot. Now you have to work on your simultaneous stirring method. I get bored and see if I can stir them in opposing directions, or even better, opposing figure eights. I don’t know why the recipe says to do it in two batches – but that is what it says.

I managed that until both pots got up until 215 degrees and then I married them together to coax them up to the 218 – 220 range. This magic temperature is apparently the “jelling” point for my particular altitude  – yours might vary. I also used the whole “put a small dish in the freezer and plop some jelly on it” trick. Let that sit in the freezer for two minutes (while you have intelligently lowered the heat on your molten lemon napalm) and see if it has set up by trying to pull a Red Sea Split on it with your finger. What finger you use is discretionary.

Pack into jars leaving 1/4″ head space. Make with the de-bubbling and rim wiping and ring tightening as usual. Boiling Water Bath for 15 minutes if you live between 1K & 2K feet like me – adjust for your altitude.

Conclusion:

The hubby and I spent a little time scraping the jelly from the inside of the cooking pots and eating it while making happy noises. I cannot wait to try this for real. It was a fair pain in the butt process wise, but I have found myself contemplating buying more ingredients so that I might make this again soon – I want to have more. One note, I ended up short 1/4 lb of kiwi, so it might have actually made the full number of half pints the recipe called for.

I am feeling pretty good about making this without any added pectin. It is only my second time doing such a thing, the first was a Dried Fig Preserve with apples and oranges providing the pectin. Even though it wasn’t done for this can jam – would anyone be interested in that recipe?

Recently my cooking has not been very exciting, hence my lack of posting anything here. I feel like it must be exciting for me to post it here because really, who wants to hear about my umpteenth iteration of fried rice. Cooking for one is simply not conducive to creativity. If one makes too much guess who is stuck eating all of something that might not have been the wisest flavor choice? Me, that’s who. Because lord knows that the Eman ain’t eating it if it isn’t nugget shaped or covered in syrup.

This is where other blogs come in – they can figure it out for me.

I love Smitten Kitchen. I know, me and eighty billion other people, but hey – that many people cannot be wrong can they? So the other night I turned to her for dinner and I ended up eating this:

Peanut Sesame Spaghetti

Her recipe can be found here: Peanut Sesame Noodles/Smitten Kitchen

Since I was cooking only for myself I monkeyed around with it quite a bit, first off cutting it in 1/2.

Not Quite Smitten Kitchen Peanut Sesame Noodles

Hardware: skillet, big pot to boil spaghetti, stirring type utensil

Software:
2 Shallots, chopped finely
1 Carrot, peeled and coarsely grated
3 T Smooth Peanut Butter
2 T Soy Sauce
1/3 C Warm Water
1 1/2 t Ginger, fresh
1 t Garlic, minced
1 T Rice Wine Vinegar
2 1/4 t Sesame Oil
1 T Oyster Sauce
Smidge of Garlic Chili Sauce
Dry pasta of your choice – I used spaghettini

First off, SK had all kinds of “delicious” vegetables in her dish, which is fine and well for people who find vegetables “delicious”. I do not. I have to force myself to eat veg, and the ones I will eat are limited. Shallots count and you will not convince me otherwise. I started out by sauteing the shallots in some olive oil (you can use whatever oil tickles your fancy) until they got a little brown. While that was happening I mixed everything else up in a liquid measuring cup and whisked it together to get it all loosey goosey.

When I felt the shallots were considering going all nuclear on me I poured in the sauce mixture and stirred like crazy. Then I set about fiddling and tasting and adjusting things to my taste. You will have to do that for yourself. Also, I set a pot of pasta on to boil before I started any of the proceedings. You remembered to do that, right?

I love using grated carrot. It saves me from having to use my pathetic knife skills and it also needs minimal to no cooking. I put the grated carrot directly into my serving bowl and then dumped a serving of the drained, cooked pasta directly on top of the orange ribbons. About 1/2 of the sauce I had made went over top of the whole shebang and I stirred it together well with hot tong action. Actually, I tried to do the fancy pants lifting and twisting to combine thing that Hot Shot Mario Batali does on his cooking show (why of why did you steal my Molto Mario Food Network – curse you **shakes tiny fists at sky**) and it didn’t work out so good for me.

Unlike SK I ate it hot – and I didn’t even have the sesame seeds for garnish, so I couldn’t forget to toast them. A couple of days later I reheated the sauce (with added water) and tossed it with some frozen breaded shrimp that I baked in the oven. Served it over rice and it was just as tasty as the first time around.

I know that it wasn’t as fancy as what you did, but Thank You anyway Mrs. Kitchen.

ps: I have been wondering what this would taste like with Cashew Butter – anybody want to try it and let me know?

A post, a post! A post that is actually on topic! Making your own convenience foods, one easy place to start is with the humble potato. I love potatoes, in most any form I love potatoes. When your grocery runs a special, 10 lbs of potatoes for $3.50 and you are only feeding 2 – 3 people it is hard to take advantage of the bargain. Because a bargain isn’t exactly a bargain if it rots in your pantry. And that is what my 10 lb bag of potatoes was thinking about doing.

When you realize something is on the brink of going to the dark side what do you do? You do something with it! Don’t let it go to waste.

Having used 5 or 6 of the potatoes in the hulking bag of tubers I was faced with the need to Do Something with them before they went all Darth Vader on me. I was heating up the oven to make dinner, so I went through the bag and picked out the most pleasingly formed of the bunch. Your classic “baking potato” shape that is so happy sitting beside a steak. Wash, dry, assault with fork, rub with oil and sprinkle with salt – chuck directly onto the oven rack at about 375 until done (about 45 minutes).

While the bakers were baking I washed, dried and mostly peeled the rest of the bag. Cut into chunks and tossed into a large pot with enough water to cover I boiled them for about 20 minutes – until tender. Drain and return to the hot pot to allow some of the water to steam off (low flame can help if you need it).

I left those hanging out and removed the bakers from the oven. Then I went and watched Cars for the 2,345,24354,374th time with the Eman. Once he was down for the count I started the serious cooking. Cut the bakers in half longways and scooped out the flesh, careful to not pierce the skin and leave enough of a shell of ‘tater so they could stand up on their own. The ‘tater innards joined the boiled ‘taters in a large bowl (actually the bowl of my Kitchen Aide mixer) so that they could fulfill their special purpose.

******’tater fest 2009******

Is there a more comforting food?

Is there a more comforting food?

I have never mashed quite this volume of ‘taters before, but  it pretty much works the same way as always. Scald some milk, melt a stick of butter, salt & pepper to your heart’s content. Mix, mix, mix, using your spoon to redeposit the escapees (because my mixer was just that full). Once you have achieved mashed ‘tater Nirvana then you are ready to proceed.

I removed what I felt would be enough mash to refill the baker shells and then added some cheese, green onions and garlic powder to the mix. Spoon the mixture back into the shells, filling only to the top the first time around; and then topping off with the remaining mixture so that they are overflowing.

Here is where the amazing part comes. Place all of the filled baker shells on a sheet pan and deposit in your freezer. Allow them to freeze overnight and then wrap them individually in plastic wrap. Put them all in a freezer bag and you have your own – home made – frozen twice baked potatoes. When you are making a meal pull however many you want out of the freezer and put them directly into the oven (on a pan) with whatever else you are cooking. Cook until they are hot all the way through and browning on the top. I baked 7 potatoes so now I have 14 twice baked potatoes in the freezer.

The remaining mashed ‘taters? Those can be frozen also. I use quart freezer bags and fill them with what I consider a “family sized” portion, partially zip the lock and squeeze as much air out as you can. Once your bag is sealed lay it down on it’s side and squish the ‘taters out until you have a flattened layer around 1/2 inch thick. When you freeze flat like this it is much quicker to thaw whatever it is you are freezing, and you have the added bonus that you can stack things in your freezer. Or file them like they are in a hanging file. You can either thaw them in a simmering bath “boil in bag” style or cut the bag off and nuke their little spuds hot. I tend to nuke at 50% power, a few minutes at a time, stirring a couple of times in the process.

I ended up with 3 quart bags with a “family sized” portion in each. So, 14 2x baked potatoes and 3 meals worth of mashed potatoes all stashed in the freezer. And how much did it cost me? If you add in the butter, milk, cheese and green onions it might total $5.00.

$5.00

Isn’t that kind of savings worth a couple of hours in the kitchen? Don’t forget to add in the time you will save when preparing future meals featuring these ‘taters, you’ve got side-dishes for at least 6 meals for a family of 4, more if you are like me and only feeding 2.

Flavor to the max

Flavor to the max

I have been at my parents house for a few days and on occasion I help my Mother cook. Not that she needs help, she is a very good cook, but sometimes it is nice to give her a break. Something interesting that occurred to me while there was the difference in our pantries. There are some things in my pantry that I consider essential that for her would be downright weird. A reflection of my obsession with ethnic markets perhaps, but things I use in everyday cooking.

I guess it is a form of “fusion” cooking but when I find an ingredient that is useful it does not get relegated to a portion of the pantry that is reserved for when I cook that specific cuisine. This Chili Garlic sauce is one such ingredient.

Heat is something that I have problems with. I do not care for really spicy food – yet I married a man from Louisiana who has an extensive collection of hot sauces. This particular one has been in my ‘fridge since we got together, and I had left it to him. He used it on Chinese delivery to spice things up – and apparently it is useful for that.

But I recently discovered that it is a fantastic workhorse. I have been trying to find a happy medium with spice, notching things up until they are at the top of my tolerance level. When I do this they have what my husband considers “a pleasant kick” – yay!

The thing that is great about this sauce is it’s neutrality. It has both Chili and Garlic in it and it does not have a distinctly “Asian” flavor. Through experimentation I have found I can use it to heat up Tex-Mex, Italian and Indian foods. Anything that already has garlic in it is fair game

And really, even if there isn’t garlic, what savory dish doesn’t benefit from a little garlic? If you want to experiment with this sauce (and I highly encourage that) know that it is pretty darn spicy. When I say I add it to something, say spaghetti sauce, I add what might be classified as a “smidgen”, literally an amount about half the size of my pinkie finger nail. Take it easy and add it in small increments until you reach a happy place.

This is what I decided to share today! What do you have in your pantry that you consider essential but would look like a pink elephant in your Mother’s pantry?

Update! So I have been watching my stats to see what is bringing people to my site and apparently I have been attracting people who, like me, cannot spell Avgolemono correctly. Heh. So I thought I would add this and see if I can catch people who can actually spell. And just for kicks lets say “Greek Chicken and Lemon Soup”. HaHA take that Google analytics. 7/30/09

Now Back to Your Regularly Scheduled Post

In the recent months I have seen numerous posts in the food-blogoverse singing the praises of homemade stock, and I couldn’t agree more. It is an awesome thing to have around, and the feeling of satisfaction I get from making something delicious out of stuff that is pretty much garbage is wonderful. But, I am not going to tell you how to make stock.

Many people have done it much better than I have. For my most recent stock making endeavor I made use of advice from Michael Ruhlman. I didn’t try his oven method, I think that might work for a big manly man like him who doesn’t have a problem moving around a large stock pot full of very hot liquid, but I did avoid allowing any bubbles. I brought the stock up to 180 – 185 degrees and then reduced the flame to low so it would stay there for … oh … 5 hours or so.

Also from his tips, I didn’t put the veggies in until the last couple of hours of cooking. This didn’t seem to effect the flavor and it made the straining much easier because the veg didn’t disintegrate. Speaking of straining, in the past I have tried the flour sack cloth and the cheese cloth and they both end up being a pain in the butt. But one thing that I always have laying around the kitchen is coffee filters. They fit perfectly in my hand strainer and allow me to strain the stock only once. So there, I do have a secret for you. Another little secret that I have is that I like using coriander seeds in my stock. But I do not like straining out all of the seeds and stuff, so I cram it all into a tea ball that I have and let that dangle off of the edge of the pot. Because who has those fancy pants sachets hanging around?

Most of the stock that I make goes nigh on directly into the deep freeze, but I always like to make something a little special to use it when it is fresh. And I never have enough freezer boxes to freeze it all. What can you make that really showcases the flavor of your newly minted stock?

Golden, Liquid Love

Golden, Liquid Love

If you have some dumplings hanging out in the freezer now would be the perfect time to make chicken and dumplings. But I sent my last batch away with the Hubby so he could have some home cooking away from home. So instead I made Avoglemeno Soup, also known as Greek Lemon Soup in Joy of Cooking.

Avoglemeno Soup: adapted from Joy of Cooking

The Hardware:
Saucepan, liquid measure or small bowl.

The Software:
3 C Chicken Broth
3/4 C Cooked Rice or raw Orzo
2 Eggs
2 – 3 T Lemon Juice

1) Put broth in saucepan and add rice or orzo. If using rice, you just need to get it to a simmer, if orzo – cook until tender. If you are using orzo you will probably need to use more stock because some of it will boil off.

2) Make sure you stock tastes good, I like to add some granulated garlic at the beginning to give it time to bloom. I think it makes it tasty, also consider adjusting with salt and pepper to your taste.

3) Put lemon juice into liquid measure (or the small bowl, but something with a spout is really better for this). Break in the eggs and beat with a spoon until a consistent color.

4) Turn the heat off of the soup and stir swiftly. Pour the egg/lemon mixture in a thin, steady stream and try not to hit the stream with your spoon (DON’T CROSS THE STREAMS RAY). Continue pouring until it is all in and the soup has gone all opaque and stuff. Serve and devour.

Hacks:

You can add lots of nummy stuff to this soup. Some people add greens (spinach and the like) and I have been known to put diced carrots in, so that I can pretend that I am eating vegetables. If I am feeling like a thicker soup I have been known to add a third egg. But I love the eggy goodness. Once I even added meatballs – but I guess that makes it some sort of bastardized Italian weddingglemeno soup.

So, what is your favorite thing that shows off your mad Stock making skillz?

Well, new to me anyway. In my quest to actually consume leftovers instead of allowing them to languish in my ‘fridge in a misguided attempt to foster the evolution of new lifeforms I have stumbled on a new casserole technique. Now I am confident that many people reading this (assuming that many people will ever read this, which is a pretty big assumption to make) will receive my revelation with a Pshaw! Pshaw I say.

But having grown up on the Ohio River the concept of a Tamale Pie was about as unfamiliar and exotic as the pink sports-coats and palm trees on Miami Vice. And somehow, I remained blissfully ignorant of the Tamale Pie as my culinary experience grew. Possibly it has to do with the fact that some dishes are not considered classy enough to warrant an entry in a “real” cookbook. But here is where my JLC come in.

In my copy of  Talk About Good published by the Junior League of Lafayette, LA there are several versions of Tamale Pie which I have perused with much interest. When I asked my husband what his opinion of Corn Meal mush was, he made quite the face. I am pretty sure if I had told him we were having polenta for supper he would have thought me quite the gourmand.

Having made a couple of Tamale Pies I now feel fairly comfortable in their construction and can safely say that I feel they are an excellent addition to my arsenal against leftovers. So this isn’t exactly going to be a recipe as much as a technique for you to use. I am afraid you will have to find other resources for your science experiments, because your leftovers will not be hanging about much anymore.

Can you love Leftovers?

Can you love Leftovers?

Cornmeal Leftover Casserole

Basic Cornmeal Mush ratio: this makes enough to top a basic 8 x 8 casserole. Increase the amount based on your casserole size. I would say your standard 9 x 11 would start with 3 C dry cornmeal and increase everything else appropriately.

1 C Cornmeal
2 1/2 C Water or Stock
2 T Vegetable Shortening (other fats might work – I just haven’t tried them)
Seasonings to taste*

Put 1 1/2 C of water, shortening and seasonings in a saucepan and bring to a boil. Mix the remaining 1 C of water with the 1 C of cornmeal. When the water has reached boiling, add the cornmeal and stir. Reduce the heat and stir, cooking for about 10 minutes. You will have to stir pretty much the whole time, if it gets lumpy discipline it with a wisk.

*Because all of my leftovers for this afternoon were Tex-Mex I used the following seasoning:
1 1/2 t Salt
1/2 t Sugar
1/4 t each Chili Powder and Black Pepper

Before I started the cornmeal mush I assembled the leftovers in a small, greased casserole. Dinner last night consisted of burritos made with black beans and ground turkey taco meat. I mixed a can of diced tomatoes in with the beans and added garlic, Lizano sauce, salt & cumin then dumped it in as the bottom layer. The next layer was some chopped onion and I topped it with the ground turkey taco meat. For some added yumminess I scattered a layer of cheddar cheese on the meat.

And then you pour on the cornmeal mush and spread it all over the top to seal in the goodness. Bake in a pre-heated 350 oven for about 30 minutes and then hit the top with your broiler until it is nice and crispy. Voila! A brand new dish that kinda tastes like last night, but not really. And man will it stretch your servings of meat.

Potential Hacks:

Kinda pointless, I know, seeing that this entire “recipe” is pretty much a hack. But I was thinking about the whole “polenta” thing and it occured to me I could use this to make a casserole from leftover Italian flavored components. Put some Italian Herbs in the cornmeal instead of the chili powder and you could use it to top off … say … a leftover batch of meat sauce layered with mushrooms and mozzerella cheese. Or maybe leftover Italian sausage and peppers … it could get interesting.

note: A true Tamale Pie has cornmeal as both the bottom and top layer, to do this you will simply have to increase the amount of mush make proportionately. The positive part of this is the fact that cornmeal is CHEAP. It is an excellent method of making it possible to have large servings that fill you up – while not breaking the bank.

When I made the Roasted Garlic and Rosemary Pork I did not set out to make pulled pork. After it was done cooking I looked at the roast that the original 2 1/2 lb chunk had become and thought “If we eat that in roast form portion control will be a goner”. At 2 1/2 lbs we should be able to get 10 servings (with the 4 oz serving of meat per person rule, technically). But have you ever sat down and carved a piece of succulent, dripping pork and stopped with only a chunk of meat the size of a deck of cards? I mean really? Who does that?

Hence the decision to pull the pork. By pulling it into shreds it filled up more visual space and gave the illusion of a large portion size without sacrificing my budget. I looked upon the mountain of meat I had created and said “It is good”. Apparently the biblical reference was not a good idea because the container in our ‘fridge has turned into a never-ending repository for pulled pork – loaves and fishes have got nothing on us.

Time to get creative, so now I am giving  you a non-recipe – more of an idea than anything else. How to change the flavor of an abundant leftover so that you don’t start eyeing the dog as a scapegoat.

Mmmm, cheesy and porky.

Mmmm, cheesy and porky.

BBQ Pork Pizza

The Hardware:

Actually up to you, I used a pizza pan but some people out there have a fancy pants pizza stone – whatever floats your boat.

The Ingredients:

Leftover Pulled Pork
Bottled BBQ Sauce (what, you thought I was gonna whip up some fancy sauce for lunch, no way. I busted out the bottle of KC Masterpiece lurking in the door of my ‘fridge.)
One small onion
Cheddar and Mozzarella cheeses (or whatever you like/got)
Pizza Dough*

Slice onion thinly and saute in olive oil over low heat until wilted and slightly golden.

Combine the pork with about 1/4 C of the BBQ sauce and set aside. Par-bake your pizza crust for around 5 – 7 minutes at 425 degrees. Apply additional sauce to the par-baked pizza crust to the quantity of your liking. Don’t use too much or it will make your crust soggy.

Attempt to distribute the pork over the sauce with a spoon and then realize that pulled pork just doesn’t cooperate. Get hands dirty and evenly distribute the pork and onions over the surface of the pizza, leaving an edge of about 1/2 inch. Add cheese on top – again to satisfy whatever twisted lactose desires you might have.

Place in oven for about 10 – 12 minutes or until your crust is nice and brown and your cheese is hot and bubblin’. My crust achieved brownness before my cheese achieved bubblin’ness so I turned the broiler on high for a few seconds as I anxiously hovered nearby with the oven door slightly open so that I could monitor the process and prevent the inevitable result of an unattended broiler moment.

Slice and serve. If Wolfgang can put BBQ chicken on his pizza and found an empire, then I can very well put pulled pork on mine and find lunch.

* I would give you a pizza dough recipe but right now my attempts at pizza dough have not been what one would consider to be noteworthy. The crust on this particular attempt was very disappointing in texture, so you really don’t want the details. When I finally manage a consistent and predictable product I will certainly share it with y’all. For now, you are probably best on your own.

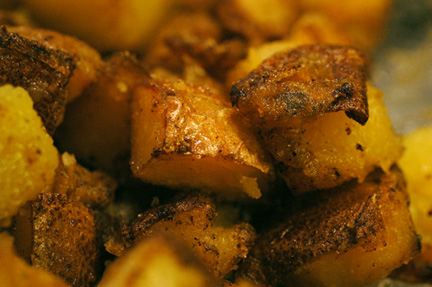
There is a high degree of probability that the term Golden Brown and Delicious was coined to describe perfectly Roasted Potatoes, and despite how humble they are you must give them props.

Ooooh yeah. Who needs french fries?

Ooooh yeah. Who needs french fries?

I have developed this recipe from a source recipe found in one of my favorite JLC* and I intend to cook from this tome many more times. “A Southern Lady Cooks With a Greek Accent” is an excellent mix of homey anecdotes and delicious recipes. Usually with my JLC I am happy if I can find one recipe that looks good enough upon read-through, and if it turns out then I am ecstatic. I currently have 4 additional corners dog-eared in Mrs. Sophia Clikas’s cook book and I cannot wait to try them.

* JLC = Junior League Cookbook. A catch-all term that I use to describe the now ubiquitous, self published cookbooks put out by organizations. I have been collecting them for years and have some doozies. Initially local Junior Leagues were the only groups that put them out – then Churches got in on the act. Now anybody and their Mother can publish one, and not all of them are good. Hallmarks of a JLC include a spiral bound format and names like Mrs. Earl Plotzkiss after each recipe as  means of attribution.

How I have digressed!

Roasted Potatoes

The Hardware:

Glass Casserole dish of sufficient size to hold potatoes with space around each chunk, Spatula

The Software:

2 T Canola Oil
1 T Olive Oil
1 1/2 t Salt
1/3 t Paprika
Fresh Nutmeg and Pepper to taste, be generous
3 Medium Russet Potatoes or combination of potatoes you like to equal
(My Potato to conversion chart says 1 Med Russet = 3 small Yukon, I like more Russet)

Set oven to 400 degrees. In your casserole combine oils and spices, place in oven while it is pre-heating.

Wash potatoes and cut into good sized chunks – somewhere between 1/2 and 1 inch squariods. The small Yukons I halved and then quartered each half – then I cut the Russets to match. When the oven has reached 400 degrees, remove the casserole and add the potatoes. Toss around liberally with the spatula, turning to ensure that all sides are coated in tasty, tasty goodness. Spread out into a single layer with as much space betwixt the chunks as possible.

Roast for 15 minutes and then use spatula to rearrange the potatoes. You will probably have to scrape some of them off of the bottom. If the layer that was in contact with the casserole sticks just scrape it off too. Those thin little layers of potato get all crispy and yummy and … well it is almost indecent. Return to oven for another 15 minutes then repeat the drill. Return for a final 15 minutes.

If at the end of 45 minutes you have not achieved GBD and a decent amount of crispiness then you might need to put them in for a scooch longer. Mind you, a scooch is a very precise measurement.

We didn’t just eat potatoes for dinner, but that will be a different post, maybe. Becuse it was tasty, but not real pretty.

Let’s get things started right. I have been working on this dish for awhile, fine tuning it to my family’s taste and I think it is ready for prime time!  It is a true pantry/freezer meal, the only things in it that have to come out of the ‘fridge are the shredded cheese and the Lizano. Everything else can be stored in the pantry. It is composed of inexpensive food items so you can buy quality ingredients without breaking the bank – the only thing you need is time. And the time is mostly hands off time, so no biggie there.

Hardware:
First off, the hardware. I make this in my 2.8 Liter Oval Souffle dish with a glass lid. It really needs to be cooked in something fairly deep as opposed to one of those large rectangular casserole dishes. A medium Dutch Oven could work, as you can see in the picture the dish ends up being pretty thick so beware anything too shallow.

The Software:

1 can Black Beans, 15 oz
1 C Brown Rice, rinsed
1 C Frozen Corn
1 can Diced Tomatoes, 14.5 oz
1 can Rotel, Mild, 10 oz
1 t Granulated Garlic
1 t Ground Cumin
1/2 t Dried Oregano
2 T Dried Chopped Onions
2 t Salt
Black Pepper to taste
1 1/2 T Lizano Sauce
1 1/2 C Water or Stock
1 t Olive Oil
Shredded Cheese, Cheddar or Queso (amount depends on the size of your container)

Pre-heat oven to 375 F. Get a piece of heavy-duty foil ready that will cover the pot.

1) Combine tomatoes, Rotel, garlic, cumin, oregano, onions, salt, pepper, Lizano, and Water/Stock in a sauce pan over medium heat – the goal is to bring it to a boil. Take your cooking vessel and spray it with non-stick, measure your corn into the dish with the rinsed rice. Rinse beans gently and add to dish and drizzle with the olive oil, stir gently to combine.

2) Once the tomato mixture has come to a boil, pour into the dish and stir to combine. Cover tightly with the foil and top with lid.

3) Place in oven for 1 hour 15 minutes. Remove foil and stir gently to get the tomatoes distributed but pat the top back out smooth, taste to make sure the rice is done.
If the rice is undercooked replace foil and lid and cook until rice is done unless the rice is really “soupy” then do not cover.

4) When rice is done, sprinkle (ok cover) the surface of the rice with cheese of choice and return to oven uncovered. Remove from oven when cheese is nice and melty and bubbling, can take 5 minutes.

Ingredients/Potential Hacks:

Obviously the mystery ingredient here is the Lizano. If you poke around some of your Hispanic groceries you can find it, it is specifically Costa Rican and if you have a market that caters more to Central Americans than Mexicans you will have better luck.

I haven’t come up with a good substitution, it isn’t a tomatoey sauce but a savory sauce. Kind of like a Costa Rican version of HP sauce. It has Cumin and pureed veggies and odd stuff in it, but it is super tasty. It is worth it to have it in your ‘fridge and see what you can put it on.

Regarding the beans; I have measured a can of beans and it contains roughly 1 3/4 C of cooked beans. So if you wanted to use re-hydrated dried beans that is what you would be aiming for, but I don’t think that simply soaking and then tossing in would work. They would need to be cooked beans.

You can definitely up the heat on this if you wanted to by buying one of the hotter versions of Rotel I am a big ole sissy so I use mild. You could even add some jalapenos if you wanted to be wacky. Another fun variation can be had if you have a Trader Joe’s handy. They sell a frozen “fire roasted” corn that gives a lovely smoky flavor to this dish when you use it in place of plain ole corn.

If you really  wanted to, you could use white rice – but we like it much better with brown. You wouldn’t have to boil the liquid ahead of time and you would use less water/chicken stock – 1 cup should do it. Also your cooking time would most likely be shorter, maybe 45 min to 1 hr. If you try this out please let me know what your cooking time was.

Enjoy!

At the end, this seems like an awful lot of writing for what is really a simple dish. The process is really one step away from “dump it in the casserole and bake” but I wanted to add in all of the little details that have made this a sucessful meal for my family. We eat on the leftovers for days, it reheats in the microwave beautifully and makes a tasty lunch.