Finally in the zone, the canning comfort zone. Really, for most people isn’t this why they got into canning in the first place? Solanum lycopersicum, the garden tomato. When reading through plant catalogs it is the siren of summer, with her beguiling aliases: Mortgage Lifter, Brandywine, Cherokee Purple, Cuore Di Bue, Green Zebra … She seduces you into ordering dozens of plants with the anticipation of this very moment, the canning of the tomato.

Was there ever any doubt what this month’s can jam theme would be? It had to be her. And as comforting as this ingredient is to me, it was still hard. Hard to do something other than make sauce. Because I horde sauce. I dream of sauce. I have nightmares about running out of sauce. There can never be enough sauce in my larder to make me think that I have enough.

But sauce is pretty boring, and I wanted to do something a little interesting. Not all like crazy weird I’ll never use the product, but something a little more complex. So I allotted some of my precious tomatoes to this task – and if tasting is any indication it was an acceptable gamble.

Canned Pizza Sauce

The Hardware: see The Canning Thing, 3 – 4 pint jars (or any combination of half pints and pints to hold between 3 & 4 pints), food mill, potato masher and a cheap a$$ serrated knife. Now, I don’t usually spend a great deal of time on hardware, I just assume if you are cooking you know what you like to cook with. But I want to take a moment to talk about cutting tomatoes.

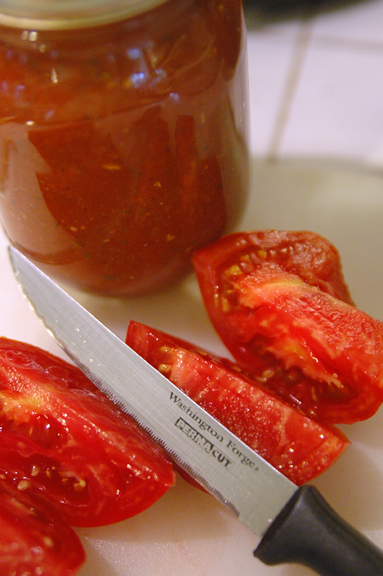
I am a knife snob. Sharp and strong is the way I like them, I don’t have many but the ones I have are choice. All last year during tomato canning I worked with a combination of my Henkel paring and bread knives, using the paring to cut out cores and such then the bread knife for cutting the bad boys into pieces. This year I had a rude awakening. I realized that the cheap block-o-knives steak knives that my hubby brought into our relationship, the ones that were relegated to the gulag of the junk drawer, were the best knives to use for processing my tomatoes. The pointy tip will cut out bad spots and the serrated “never sharpen” edges saw through tomatoes like buttah. I am chagrined.

Cutting up tomatos

Oh the shame.

The Software:
10 lbs Tomatos
4 Cloves Garlic, mashed
2 t Oregano, dried
3/4 t Black Pepper
2 t Italian Seasoning herb mix
3 C Chopped Onions
2 1/2 t Salt
3 T Brown Sugar
1/2 t Garlic/Chili paste
1 T Lemon Juice per pint

Remove cores and bad spots from tomatoes, slice in half or more depending on size, chuck into goodly sized non-reactive pot. Sprinkle with a bit of salt and squoosh with a potato masher. Bring to a simmer and cook until you can mash the biggest piece on the side of the pot with a spoon. Run through food mill and return to pot. Feed all scraps to chickens.

Add everything else except the lemon juice to the pot and simmer until the onions are soft – run through food mill a second time. (You might want to hold off on the chili paste and add that to taste depending on how spicy you like things.) Return everything to the pot (including the stuff that wouldn’t go through the mill – I like chunkies) and simmer until reduced to desired thickness. You know, pizza sauce thickness ie: thicker than a standard sauce but not paste consistency.

Add 1 T of lemon juice per pint and 1 1/2 t for a half pint – fill using your fancy canning gear and stir up a little to mix the lemon in before you lid up. 1/4 inch head-space, Boiling Water Bath for 35 minutes (sea level) adjust for your altitude.

Am I happy?

Yeah, I am happy I made this. Now I can have instant pizza sauce whenever I desire. It was hard, because for that 10 lbs of tomatoes I could have had 4 – 5 pints of sauce. The reducing kills me, I feel like I am simmering away precious tomato goodness. But I know that is silly.

Unfortunately my tomato plants are not producing as I would like this year. I managed to pull this off with home-grown, but if I am to have a larder that will allow me to sleep at night I might have to resort to the farmer’s markets. Tell me truthfully, for you, how much is enough? Do I have a problem?

ps: If I had known then what I know now, I might have held off on my Salsa Verde post and put it here instead. I am afraid that the tomatillo isn’t going to get the face time it should in this months round-up. The green stuff vs the red stuff is a Sophie’s Choice kind of conundrum for me. So take a moment and give some love to the little green guy.
Tonight for dinner I practiced a bit of desperation cooking. It is the kind of cooking where you have to eat something, but you really don’t feel like doing anything creative, or interesting, or even that is actually cooking. Luckily I have a toddler that is in his “I can live on Air and Milk” phase. I tried to be nice to him today and got him one of his favorite foods – Chick-fil-A. Long story short … I ended up with a CFA sandwich that had approximately 2 gnat sized bites taken out of it in my ‘fridge.

So I asked myself “What would Sandra Lee do?” and then I started “cooking”. I fished around in the back of the freezer and came up with 6 cubes of frozen spaghetti sauce and tossed them into a saucepan with some olive oil and garlic. Then I arranged the piece of CFA on a cookie sheet flanked by it’s buns (I peeled off the pickles and ate them). Sprinkled some garlic powder on the buns and some shredded mozzarella on the chicken and then slapped them all into a cold oven. Fired it up to 350 and put some water on to boil for spaghetti.

Yadda, Yadda, Yadda … Faux Chicken Parmesan.

I am ashamed.

Not looking so embarassing after all

Not looking so embarassing after all

But, it makes me feel much better about posting this meal, which I previously thought might be too boring/pedestrian to blog about. Obviously standards are not something that I am really strict about around here.

Pork Cutlet Parmesan

So lets talk about the Tyranny of Chicken. Perhaps it is the fact that Veal is both expensive and gauche that has led to the rise of Chicken Parmesan – but somehow the poultry lobby has managed to make any other version of a “Parmesan” dish nigh on unthinkable.

That is not to say that I bust out the boxed baby cow for a home meal – moral beliefs aside, I am too much of a cheapskate. But I do believe if I can pound it flat, bread it, pan fry it, and put some cheese on it then it is a viable candidate for inclusion in a “Parmesan” dish.

When my spelunking adventure into the freezer unearthed pork cutlets – the game was on!

A Process

Take chubby pieces of meat that are roughly the size of your closed hand (like you are going to give someone a high 5, not Jazz hands) and place them on a piece of plastic wrap. Place another piece of plastic wrap on top of them and whack the bejeebus out of them with something heavy and flat.

Not literally, you actually have to be kinda careful about not tearing the meat – but it isn’t hard. Just thwack it with something and get it flatter – now we are looking for Jazz Hands size. Do the breading thing to your pieces of flattened flesh.

The Hardware:
Skillet with oven-safe handle containing a kinda thin layer of vegetable oil and an oven preheated to 350ish.

The Breading Thing

Set up three containers with the following mixtures:
1: A beaten Egg
2: A mixture of Bread Crumbs (I am all snooty and like Panko, because nothing says Italian Breaded Meat like Japanese bread crumbs) and Parmesan cheese.
3: A mixture of plain ole flour, salt and pepper, (if you likea the espicy you can adda some red peppah).

I like having 1 & 2 in Tupperware type containers – boxes, you know something with high sides to contain the mess. 3 can just be on a plate – it isn’t crucial. When breading you need to remember that wet stuff sticks to dry stuff. So to start with your meat is wet so you want to dip it into the flour first – not to heavy, just a dusting. Then you dip it into the beaten egg to get it wet so that the dry crumbs will stick to your cutlet. From the egg mixture you move to the breadcrumb mixture – I tend to pat it to get things good and stuck to each other. I also just like fiddling with things.

If you are doing a small number (I tend to be doing 2) place them directly into your oven-safe skillet with a goodly layer of hot vegetable oil shimmering away. (Do we need to talk about melty handles again?) Let the first side get good and brown and crispy then flip them over. Chuck the whole skillet into the oven and it will brown on the other side. When it is close to being done open the oven and sprinkle whatever kind of cheese on top that tickles your fancy – I tend to always have mozzarella around the house, but I wouldn’t kick provolone out of bed.

I really cannot tell you how long to cook the things because I don’t know how efficient your pounding is. It won’t take to terribly long. Make sure you have your pasta on the boil and about ready to go and that your sauce is pretty much done and just bubbling happily on a back burner. The cutlets can sit for a bit while the pasta is finishing – but you don’t want to lose the crispy. I mean, isn’t that what it is all about? Plate your pasta, sauce to liking and top with crispy meat cutlet.

Voila! Fancy pants dinner; if Fancy Pants to you is Olive Garden, and considering the frequency of my dining out Olive Garden might as well be Sotto Sotto.

It has been a crazy week, and it only promises to get crazier. But hey, who wants a boring life? I have been cooking, just nothing exceptionally interesting, or photogenic. We hosted a play-date and I made a big batch of French Dressing in anticipation of having salad for lunch. When I pulled out the lettuce it had gone to meet it’s vegetable maker- so I had to punt. Luckily I had made rice the day before and had plenty of leftovers. That might be considered a frugal tip. Whenever you cook rice make at least 2 cups (dry, which yields 6 cups cooked). Even if you do not need that much, it comes in exceptionally handy for quick meals. And you must, must, must use leftover rice to make Fried Rice.

Which is what I whipped up for the play-date mommy. Not that I took a picture of it, because that is pretty boring. But it was tasty. When I had a latecomer walk in the door starving I used the rest of the rice to make what I call “Mexican Fried Rice”. The same cooking technique as with fried rice – but instead of using soy, ginger, garlic and sesame oil I use Lizano salsa. I could also see tossing in some beans, chopped onions, corn – whatever you have. Not particularly authentic, but again very tasty. And again, not particularly photogenic.

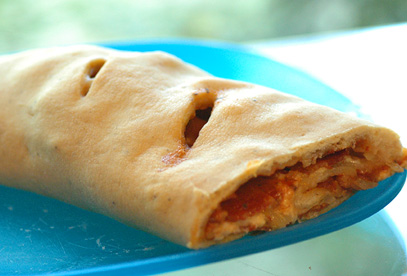
That’s been the theme of the past week – non-photogenic foods. I tried, I really did. Here is a picture of the Stromboli I made a few nights ago:

Much tastier than it looks.

Much tastier than it looks.

Homemade pizza is one of those things that is worth the time, especially when your dough recipe makes enough dough for a pizza and then another pizza or pizza like application. We usually eat pizza one night and then I put together something else a couple of nights later. Usually it is a calzone, but the ‘fridge was devoid of the requisite ricotta – so I made a Stromboli. Which is rolled instead of folded and does not usually contain ricotta.

I think that Stromboli is going to be the default for the foreseeable future. Waaaaaay easier than a calzone. And for the life of me, I cannot seem to keep ricotta in the house.

This particular bad boy involved a thin layer of pizza sauce topped with layers of bacon, mozzarella cheese, Parmesan cheese and thinly sliced onion. Normally I would have put some caramelized onions in there, but I didn’t think of it until too late. I was afraid that the onions wouldn’t cook enough so I sliced them super thin with my Most Excellent Knife of Sharpness (all kitchens should have one). In the future I will not bother with the thin slicing or the caramelizing. They stayed in the oven long enough to get nicely cooked/steamed inside the dough.

Lack of Recipe

I am afraid that is what we have today. I am not happy enough with my pizza dough recipe to share it yet. It was delicious for the Stromboli, after sitting in the ‘fridge for several days. But  the pizza I made with the fresh dough did not do it for me. It lacked that certain “chewiness” that is needed in good pizza dough. This version was much too bread like, but it lost that characteristic in the ‘fridge.

But I will leave you with one last tip – always bake bacon in the oven, do not bother with the stove-top. By using the oven you avoid 3/4 of the mess and get much better bacon (less of the fat cooks away before the lean is done). Use jellyroll/edged cookie-sheets lined with aluminum foil and clean-up is as simple as draining the fat and tossing the foil. The bacon keeps well in the ‘fridge and even longer in the freezer. And hey, bacon fat! Wonderful stuff for cooking pretty much anything. I used it to saute some mushrooms for spaghetti.

What do you use bacon fat for?

Within the recent past (last few years or so) I have overcome one of my deep seated childhood food revulsions, beans. For the longest time I could not get past the texture. Something about the smushiness combined with the resistance of the skin gave me the willies.

But no longer.

And when I discovered that I no longer despised beans, I kind of went on a bean bender. I wanted beans with every meal, I tried every kind of bean I could get my hands on. My new obsession with beans lasted almost 9 months, and then I was burnt out. If beans were in something I would not reject it out of hand as I had before, but I no longer sought beans out with the determination of a bloodhound.

Now, I have found a happy medium. Beans are a part of our weekly diet, but they are not in every meal. At times they are bit players and at times they are the star attraction. This dish is so deeply satisfying that it does not allow you to lament the fact that you are eating a meatless meal. And it makes rocking leftovers.

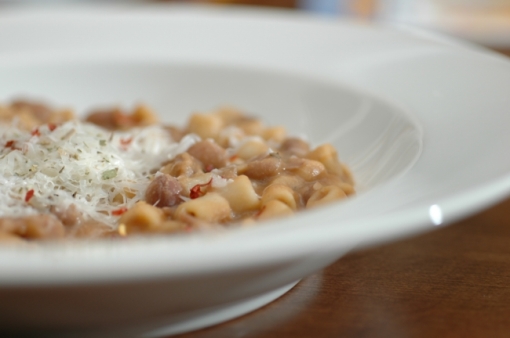
Beans and Pasta, how can one go wrong?

Beans and Pasta, how can one go wrong?

Pasta e Fagioli

Adapted from Nigella Cooks

The Hardware:

Large Saucepan or small stockpot, Saute Pan, Blender, Tea ball (optional)

The Software:

1 lb Dried Cranberry Beans
1 T + 1 t Chopped Garlic
2 – 3 Sprigs Rosemary
1 Bay leaf
1 Onion, chopped
1 T Tomato Paste
2 C Chicken or Vegetable stock or Water
7 oz Ditalini
Parmesan Cheese
Olive Oil
Salt & Pepper to taste

1) Wash and pick through beans, soak overnight or for at least 6 hours.

2) Pour some olive oil into a large saucepan (or small stockpot) and sauté onions until just browned, add 1 T garlic and sauté briefly. Add beans and cover with water 2 inches over beans.

3) Place 2 sprigs of Rosemary and Bay leaf into the teaball and hang into pot. If you don’t feel like being all fancy with the teaball then you can use a sachet – which to me seems even fancier. Nigella tells you to put it into a knee-high stocking but I think that is kinda creepy/nasty. Bring to a boil and then simmer for 1 hour. Check periodically and after beans are tender add salt to taste. Start with less then you think you will need, you can adjust at the end.

4) When the beans are nearing the end of cooking, clean and mince additional rosemary, at least 1 teaspoon – more if you like. Remove 1 C of beans from the pot and put them in your blender. Puree them well, you might need to add a little of the cooking water. While doing this, bring the beans back to a boil with the addition of 1 C of stock or water and add pasta.

5) While pasta is cooking, bring a tablespoon or two of olive oil to medium heat in a sauté pan add 1 t garlic and sauté slowly until it begins to roast a bit then add the tomato paste, minced rosemary, some salt and some pepper. Sauté briefly and then add the pureed beans and stir together well. Turn heat to low and allow to blend, if it takes too long for the pasta to cook go ahead and turn the heat off of the sauté pan and let it hang out.

6) When the ditilini is al dente, add the pureed bean mixture back to the big pot and stir well. If it seems too thick add more stock or water. Continue cooking at a simmer until the pasta is completely tender. Adjust seasonings as you like.

7) Serve in a bowl with grated parmesan and if you like a little heat, a sprinkling of red pepper flakes.

Potential Hacks:

I have made this with a mirepoix mixture in the beginning and it turns out just as nicely with the added bonus of more veggies in the dish. You could also increase the amount of tomato paste if you wanted to up the tomatoey quotient.

There are as many recipes for this dish are there are Italian mamas, and I do not claim to be an Italian mama. One of the significant variations between versions is it’s end thickness. In some interpretations you get a tomatoey broth with beans and pasta floating about among a variety of veggies. In other interpretations you could slice yourself off a chunk like cold macaroni and cheese.

Your best bet is to tinker with this until it makes you happy. The only thing you need to be careful about is when you add the salt. If you add salt at the beginning of the cooking process your beans will take forever to soften, if they soften at all. Don’t know why, if you find out let me know O.K.?

Close Up