I asked for it.

In my last Can Jam post for tigress I added a post script, throwing it out there to the canning gods that I would (pretty please with sugar on it) really like for the next jam to include cucumbers. And lo, the canning gods (or at least the goddess over at Laundry Etc) heard my appeal and were generous.

You know what other things in my life were generous – my cucumber vines. They were so crazy that I had a hard time keeping up with their production. Did you know that if you leave a cucumber on the vine long enough it will get gigantic and eventually turn orange? Well, I do now.

Luckily the chickens like overgrown cucumbers – the seedier the better.

To deal with the deluge of cucumbers my mother came over last week and we had our own little pickle jam. It took most of the day but we put up a double batch of Bread & Butter pickles (totaling 12 pints) and a little experiment for me. I only got 6 jars of the B&B’s but all of the experiment, because mom just doesn’t roll that way.

If you want to make the B&B’s check out this previous can jam post on onions. Instead of 16 cups of onions, go with 15 cups of sliced cucumbers and 1 cup of sliced onions. Volia – two for one recipe.

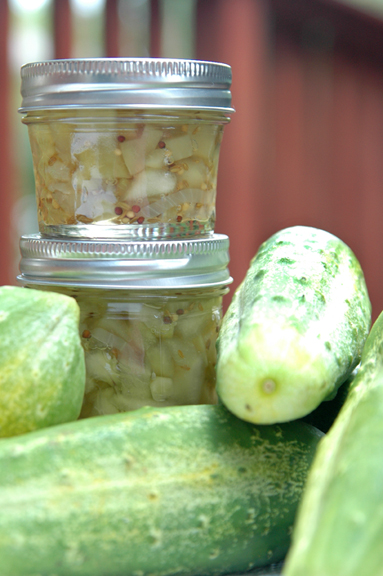
But on to the experiment (I don’t have a picture yet – but tigress asked us to get things up early(er)than we usually do – photo to come done). From my trusty tome on canning The Complete Book of Small-Batch Preserving I busted out with something I have had bookmarked for quite some time. Actually, I should probably just do away with the bookmarks in this book and just start marking the recipes that I don’t want to do – it would make life easier.

Indian Style Pickle Relish

When you grow your own - they aren't as photogenic.

Indian Style Cucumber Relish (with slight modifications)

The Hardware: see the Canning Thing, slotted spoon, 6 half pint jars (or like I did – 5 half pints and 2 quarter pints).

The Software:
6 C Cucumber (diced, seeded & peeled)
2 C Onions, thinly sliced
1 T Salt, pickling
2 C White Vinegar
1/2 C Sugar
1 T Cumin Seeds
2 t each Brown & Yellow Mustard Seeds
Big pinch whole peppercorns

Put your chopped/sliced veggies in a big bowl and sprinkle with salt – allow to stand for 4 hours (the original recipe said stirring occasionally, I totally forgot this step because I was canning the B&B’s).  Drain, rinse and drain some more. Combine everything else in large, non-reactive, saucepan and bring to a boil over high heat. Add veggies and return to a boil – hold at boil for 30 seconds.

Using a slotted spoon, pack veggie into jars and then ladle liquid over the relish to head-space of 1/2 inch. Boiling water bath for 10 minutes (half pints) 15 minutes (pints) adjust for altitude.

Conclusion:

The reason that I was so excited about this recipe is not exactly about it’s use as a relish – the book suggests it “peps up” meat dishes – but because of another suggestion the authors make. They say you can mix this stuff with yogurt and poof! instant raita. Instant anything from a canned item makes me oh, so happy. And this has given me another idea – can I make a cucumber relish that has all of the flavors of tzatziki so that I can have that creamy deliciousness on demand? Anyone got a recipe close enough so we can tweak it?
The mantra “You eat with your eyes first” is everywhere. At times one could almost think that perfection in plating supersedes the food itself, but I have a confession to make. I seem to have a problem. You see, I have recently come to terms with the fact that I appear to like food that looks like a big pile of glop.

Really, it is almost impossible for a decent looking picture to be taken of many of my meals. Needless to say they do not meet with the beauty ideals of many of the food porn aggregators. But I am not going to let that stop me from eating this messy but divine food. Nor am I going to allow the pretty police to shame me into not sharing the results here. What am I talking about, if you look back in my archives (such as they are) you will see. I’ll wait …

dum, di, dum ………..

Nah, too impatient. Here’s an example for you:

So ugly, yet so yummy

So ugly, yet so yummy

I cannot explain my recent decision to wade into the wilds of Indian cuisine. I have a friend who is mildly obsessed (if that is possible, kinda contradictory) with all things Indian. Never have I really eaten Indian food in a restaurant, except for Tandoori and that doesn’t count. All I know is that I found myself browsing the bulk spices at Your DeKalb Farmer’s Market and for some reason felt compelled to purchase the tub of Madras Curry – Mild. I think it was the Mild that got me, because I am a big fat sissy when it comes to heat.

With my Madras Curry – Mild I made a delicious but horridly ugly Lentil, Potato & Coconut curry that was off some British website. I loved it, and that really surprised me. On my next trip to the library I checked out Julie Sahini’s Introduction to Indian Cooking and haven’t looked back. I have already renewed the due date so I don’t have to take it back too soon.

Gosht Masala: adapted from Introduction to Indian Cooking

The Hardware: Heavy sauce pan, crock pot, rice cooker.

The Software:
1 1/2 lbs Pork Butt in 1 1/2 in chunks
~3 T Canola Oil
2 C Onion, finely chopped
1 T Ginger, Fresh grated
3 t Garlic, minced
2 t Cumin, ground
1 T Coriander, ground
1/4 t Cayenne
1 T Paprika
1 t Tumeric
1 C Tomato sauce
Salt to taste

1) Heat 1 T oil in pan and sear meat on all sides. When nicely browned, remove to the crock pot – pot (or should that be crock pot crock?). Add some more oil and saute the onion for 10 – 15 min, until nice and brown. Use your spoon to make sure the leftover porky bits don’t burn.

2) Add ginger, garlic, cumin, coriander, cayenne, paprika & turmeric to the onions and stir like the dickens – keep scraping with your spoon. Heat for 3 min or just until you think that everything is going to burn, then toss in the tomato sauce. Add in some water ~ 1 C or so, and “deglaze” the pan. Use your spoon to scrape up all the brown gunk the meat left behind, take your time and you will be rewarded.

3) Add salt at this point, but remember you can always add more later. Pour the sauce into the crock pot crock and add more water and/or tomato sauce so that the meat is covered. I didn’t have all day so I cooked it on high for about 3 1/2 hours. I am guessing you could go low and slow for hours. Your goal is to get the meat falling apart tender.

4) Once it is done, it really behooves you to put it in the ‘fridge and let it sit for a couple of hours before you serve it. Overnight is even better, several days ain’t gonna hurt it one bit. Serve over rice.

Hacks:

Well, I actually left out one whole ingredient that the recipe called for, and that is Cilantro. You are supposed to sprinkle 1/3 C of chopped fresh Cilantro over the top at the end. Would probably be extra tasty and might have even made the picture more attractive – but I didn’t have it and this dish was still mmm, mmm, noise making happy.

Also, the original recipe called for boneless leg of Lamb chunks, which I was fresh out of. I did have the pork chunks, 3/4 lbs worth, so I used those and made a half batch. I used my itty bitty crock pot that is normally only used for keeping my Velveeta+Rotel dip from congealing into one creepy, orange cylinder of Midwestern pot-luck disaster, and it worked fine. The non-crock pot directions call for adding the meat back in at step 3 and simmering, covered, for 1 1/2 hours. 1 1/2 hours that I didn’t have to be tending the stove.

Finally, the recipe called for pureed tomato, not tomato sauce. I bought the wrong thing at the store, my guess is the extra onion, garlic and oregano in the sauce didn’t hurt a thing. One thing I did not do was add any veggies, and I really wish I had. Veggies would make this a one pot wonder. The question is, what veggies would be appropriate here? Do any of y’all have any ideas?

And please, don’t say cauliflower.

I hate cauliflower.

Scary Zombie Broccoli vegetable.